Seamless Speech-to-Text Conversion With Firebase Extensions
Firebase
Nov 8, 2023
Introduction
The Transcribe Speech to Text Firebase Extension provides a streamlined workflow for automatically transcribing audio files in a Firebase Cloud Storage bucket. By leveraging the power of Google Cloud’s Speech-to-Text API, it offers transcription that can be stored in Firestore or alongside the original audio files in Storage.
Google Cloud Speech-to-Text API
Google Cloud Speech-to-Text API is a state-of-the-art machine learning model that converts spoken words into written text. It supports various languages and dialects, allowing accurate transcription across different contexts and use cases.
Getting Started
Before tapping into the power of automated speech-to-text transcription, ensure you have a Firebase project set up. If it’s your first time, here’s how to get started:
Once your project is prepped, you can integrate the speech-to-text transcription extension into your application.
Extension Installation
The Transcribe Speech to Text extension can be installed via the Firebase Console or the Firebase CLI.
Option 1: Firebase Console
Find the Firebase Extensions catalog and locate the “Transcribe Speech to Text” extension. Click “Install in Firebase Console” and complete the installation process by configuring your extension’s parameters.

Option 2: Firebase CLI
For those who prefer using command-line tools, the Firebase CLI offers a straightforward installation command:
firebase ext:install googlecloud/speech-to-text --project=your_project_id
Configure the extension
Setting up your extension correctly is crucial for tailoring the speech-to-text transcription to your needs.
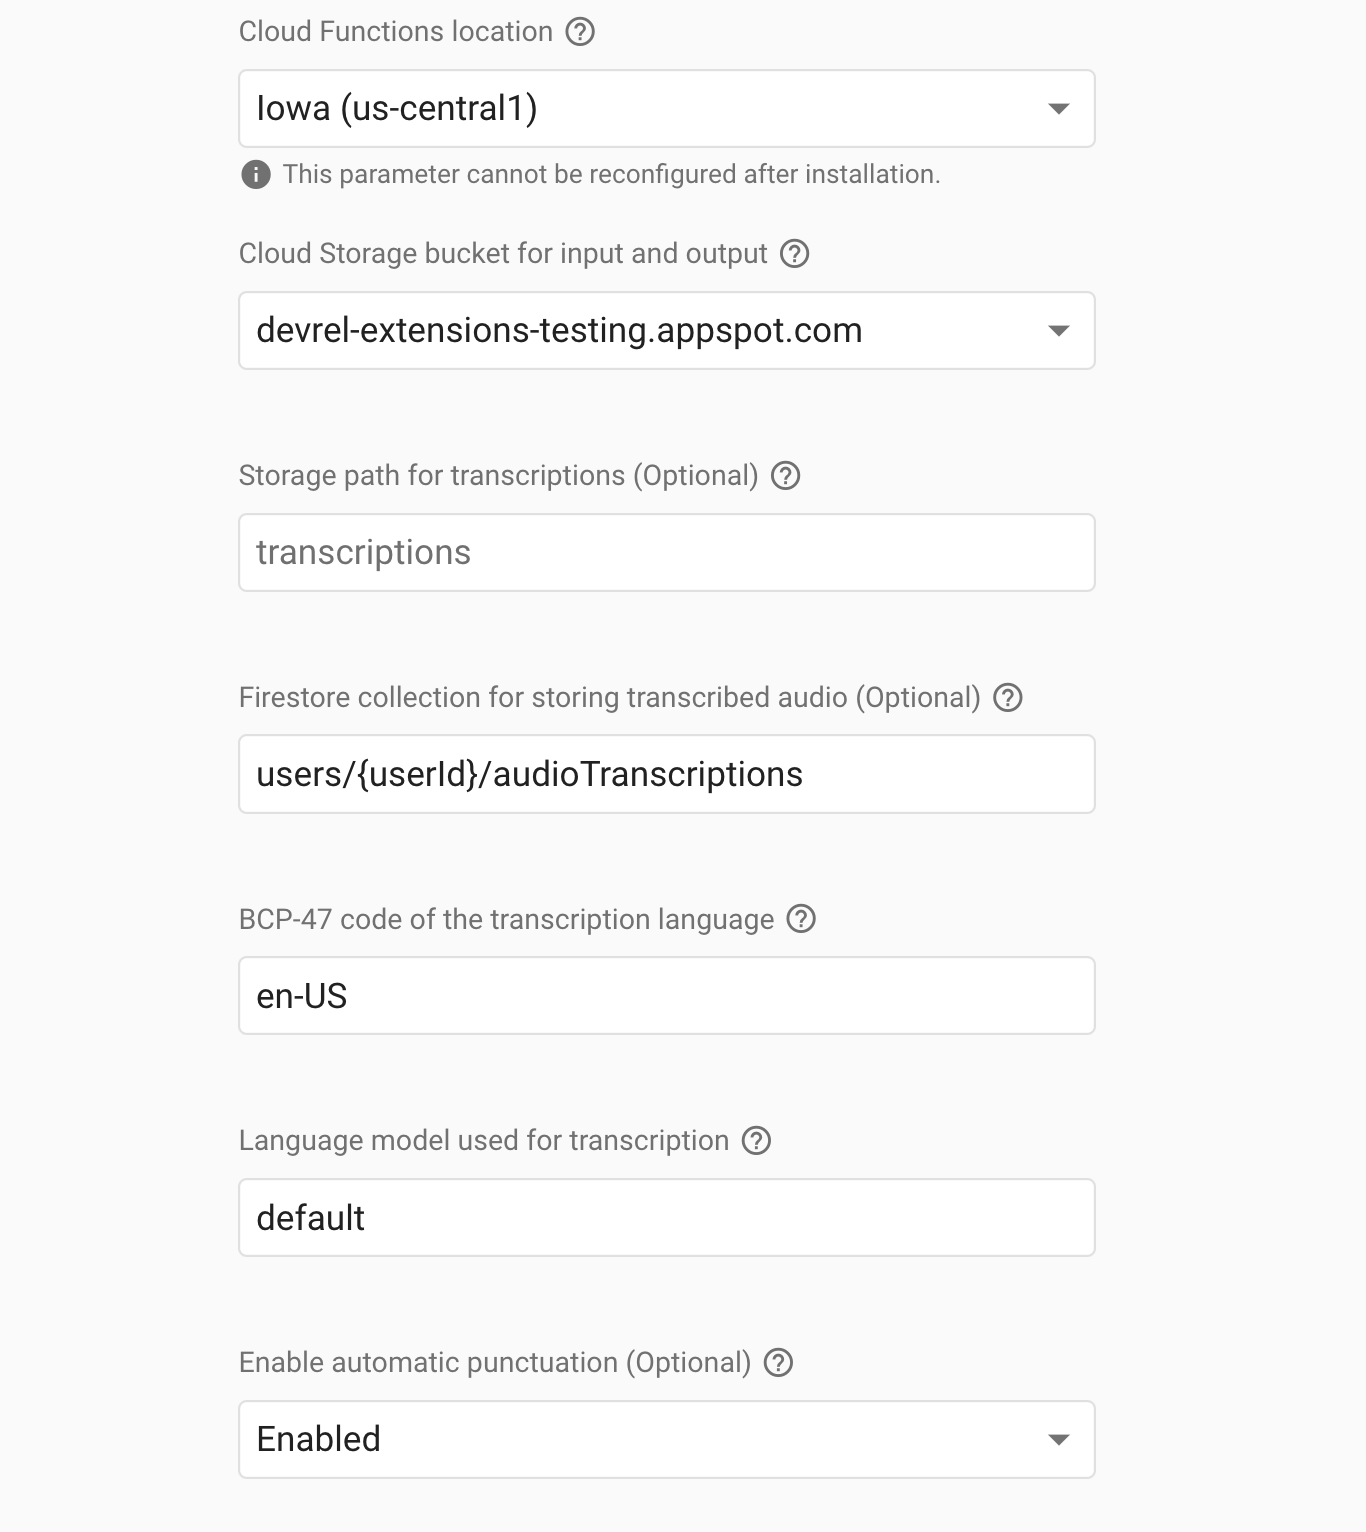
Configure these parameters to optimize the transcription:
- Cloud Functions Location: Choose where to deploy the Cloud Functions for the extension. For instance, for a database in Iowa, select
us-central1. Refer to the location selection guide. - Cloud Storage bucket for input and output: Designate the Cloud Storage bucket that the extension should monitor for audio files—for example,
devrel-extensions-testing.appspot.com. - Storage Path for Transcriptions (Optional): Specify the path within your Cloud Storage where transcriptions should be stored. Leave blank to use the bucket root or set a path like
users/{userId}/audio/. - Firestore collection for storing transcribed audio (Optional): Enter the Firestore collection where you’d like to store transcriptions, such as
users/{userId}/transcriptions. Leave blank if you do not want to keep transcriptions in Firestore. - BCP-47 code of the transcription language: Set the BCP-47 language code for transcription, such as en-US. The BCP-47 language code is a code system that identifies human languages for computer processing. It comprises two or three letters of the ISO 639 code for the language, optionally followed by additional subtags separated by hyphens that specify dialects, scripts, or regional variants. For example, en-US represents English as spoken in the United States, and zh-CN stands for Chinese as spoken in China. These codes are used in various software and standards to ensure the correct application of language-specific processing and presentation. View supported languages.
- Language model used for transcription: Choose the optimal model tailored to your audio content for the most accurate results. If left unspecified, the system automatically selects the best model according to the audio’s characteristics outlined in the RecognitionConfig. Below are the models you can choose from:
- latest_long: Ideal for longer content like media recordings or conversations.
- latest_short: Suited for short phrases such as single commands or quick responses.
- command_and_search: Perfect for brief voice commands or search queries.
- phone_call: Designed for audio from phone calls, typically with an 8kHz sampling rate.
- video: It is best with recordings at 16kHz or higher for audio from videos or involving multiple speakers. This premium model incurs higher costs than the standard rate.
- default: A versatile choice for undesignated audio types, preferably with high fidelity and a sampling rate of 16kHz or above.
- medical_conversation: Tailored for dialogue between healthcare professionals and patients.
- medical_dictation: Optimized for medical providers’ dictation notes.
- See the model section for more information.
- Enable automatic punctuation (Optional): Decide whether the transcription should include automatic punctuation. Options are true for enabled or false for disabled.
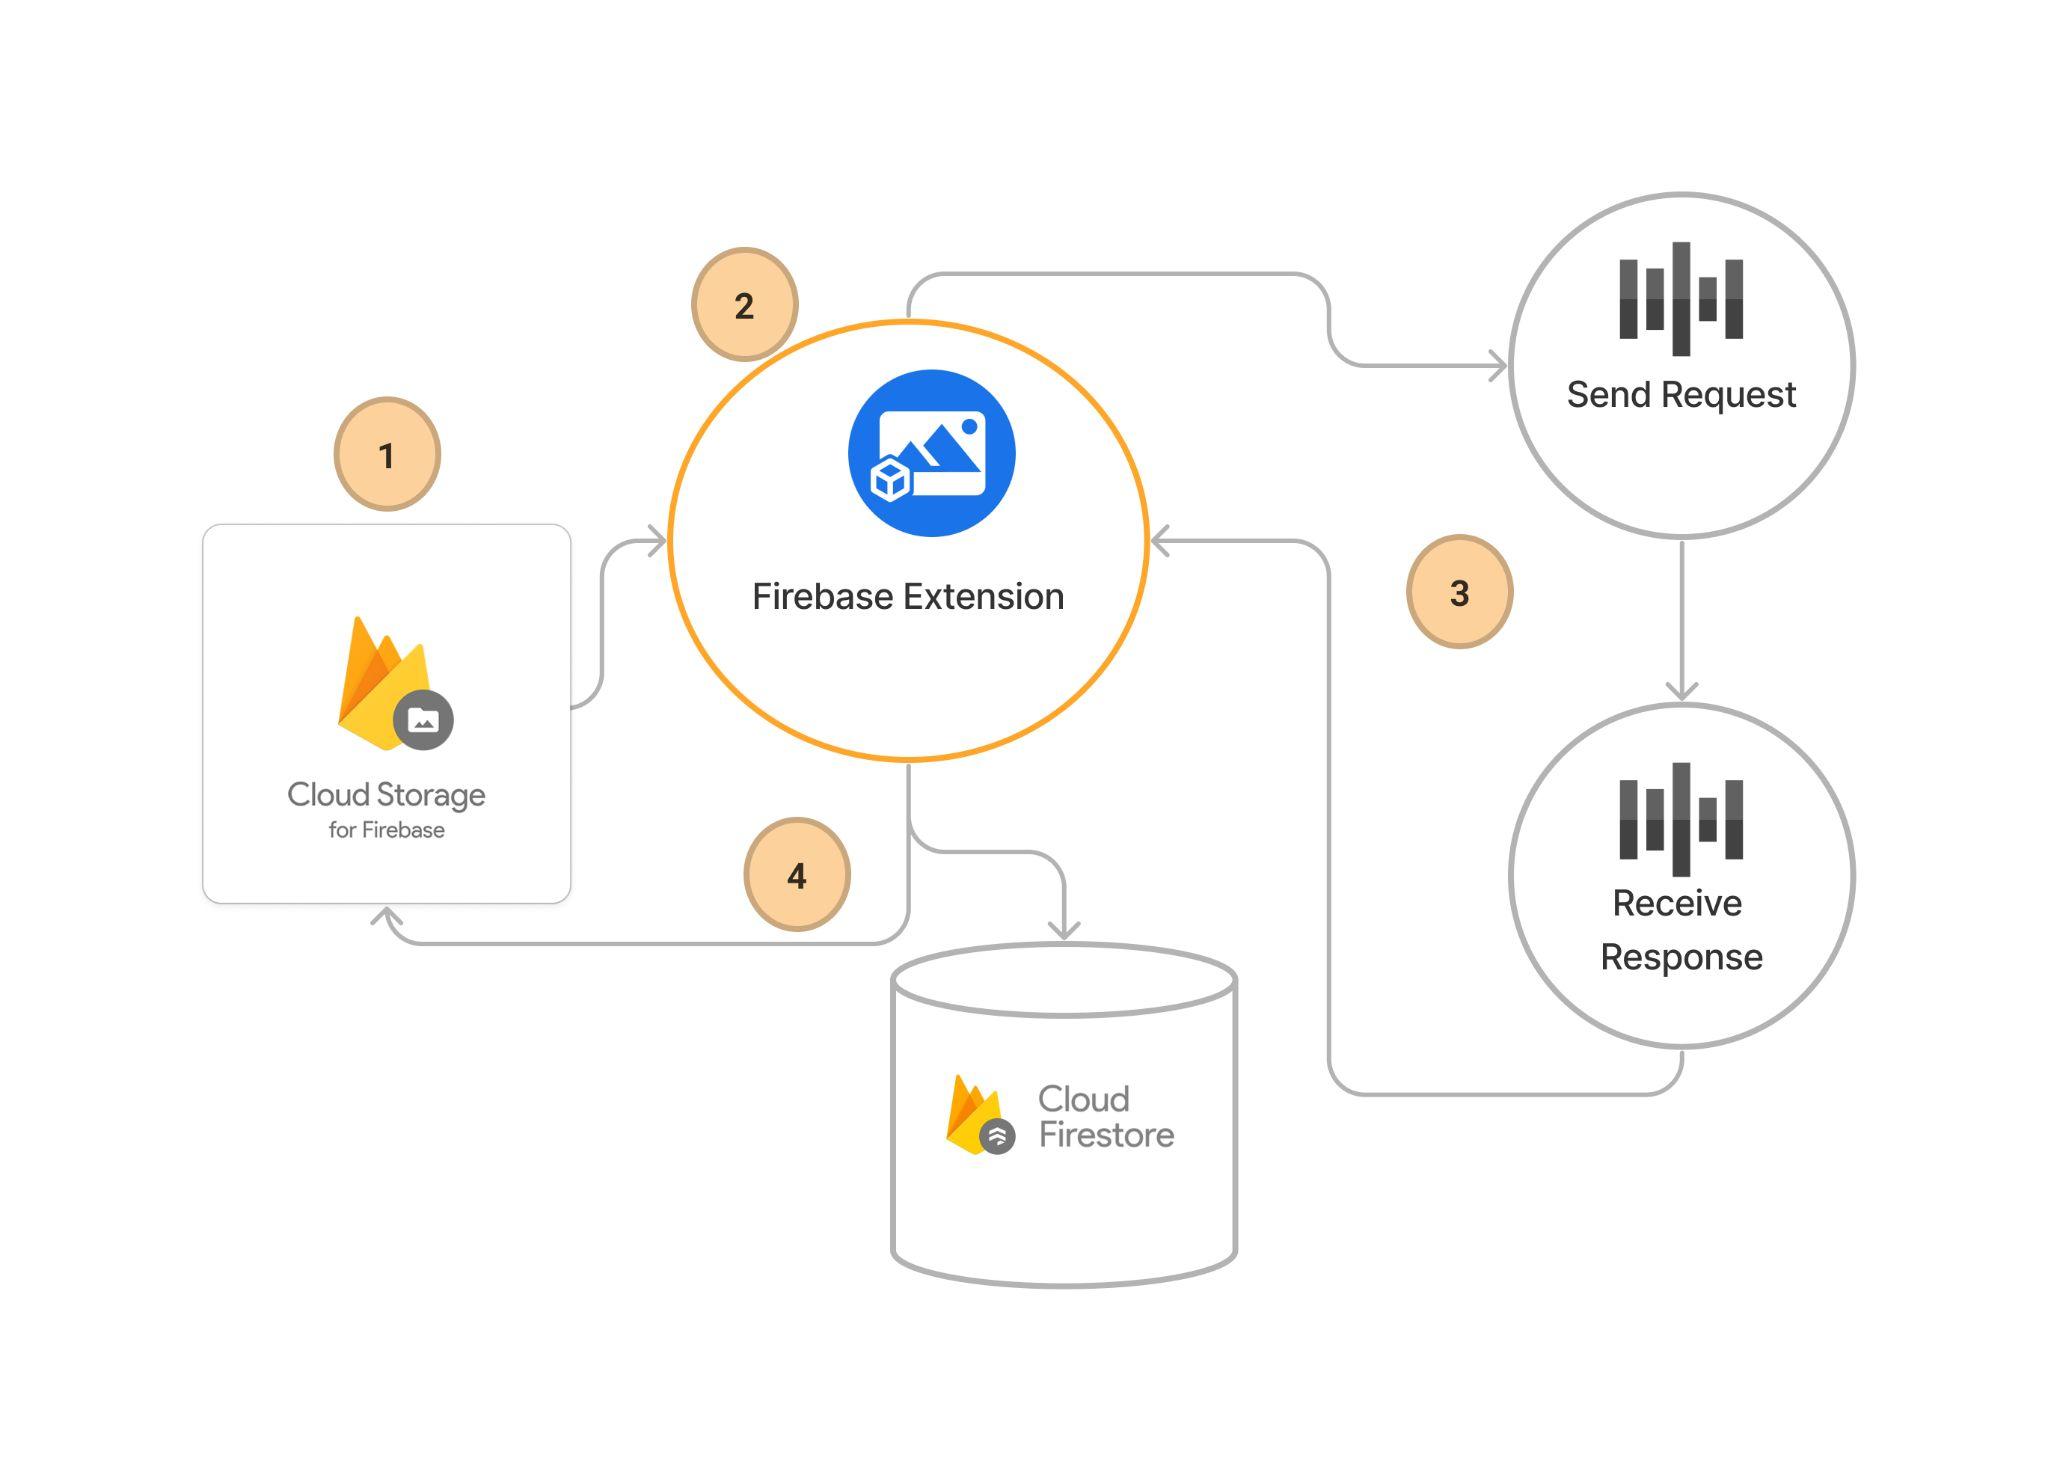
Transcription Workflow
After installation and configuration, the extension seamlessly kicks in when audio files are added to your specified Cloud Storage path. Here’s the automated sequence of events:
- File Upload: Initiate the process by uploading your audio file with ContentType set to audio/* to your Firebase Cloud Storage bucket. This is the foundational step that triggers the transcription workflow.
- Extension Activation: The extension monitors Cloud Storage and detects when a new file is in the specified path and then sends it to the Google Cloud Speech-to-Text service for processing.
- Speech-to-Text Processing: Google Cloud Speech-to-Text takes over, analyzing the audio content. Once the transcription is complete, the service sends the text data back to the extension.
- Transcription Storage: Finally, the extension takes the transcribed text and creates a .txt file, which it then writes back to the Cloud Storage and, if defined, to a Firestore collection for persistent storage and easy retrieval.
Steps to Transcribe Audio Files Using Firebase Speech-to-Text Extension
Before you begin, ensure that the Firebase SDK is initialized and you can access Firebase Cloud Storage and Firestore.
const firebaseConfig = {
  // Your Firebase configuration keys
};
firebase.initializeApp(firebaseConfig);
const db = firebase.firestore();
const storage = firebase.storage();
Also, you already have a UI that can handle selecting audio files, for example:
// HTML input element for file selection
<input type="file" id="audio-upload" accept="audio/*" />
JavaScript to handle the file upload
document
  .getElementById('audio-upload')
  .addEventListener('change', handleFileUpload);

function handleFileUpload(event) {
  // Get the file from the input element
  const file = event.target.files[0];
}
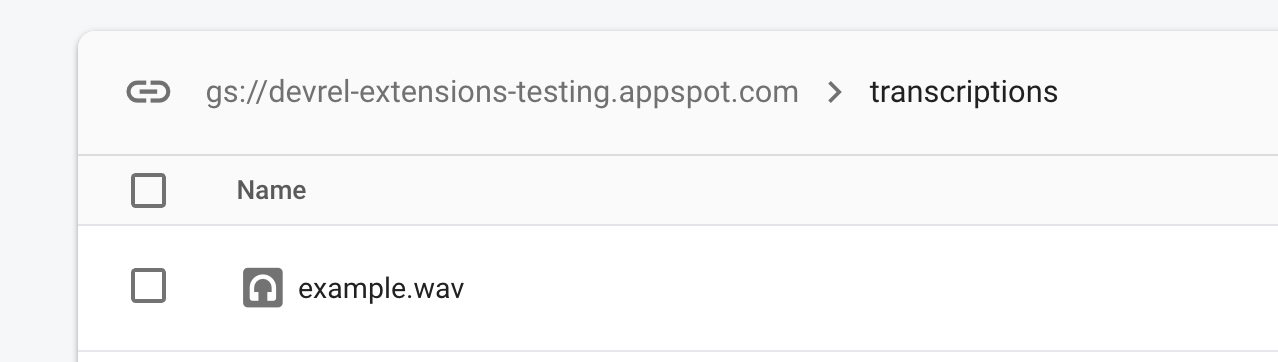
Step 1: Upload the Audio File to Firebase Cloud Storage
Upload an audio file to a specific path in Firebase Cloud Storage that the Speech-to-Text extension is configured to listen to.
//Assuming you know userId from the context
const audioRef = storage.ref().child(`users/${userId}/audio/${file.name}`);
audioRef.put(file).then((snapshot) => {
  console.log('Uploaded an audio file!');
});
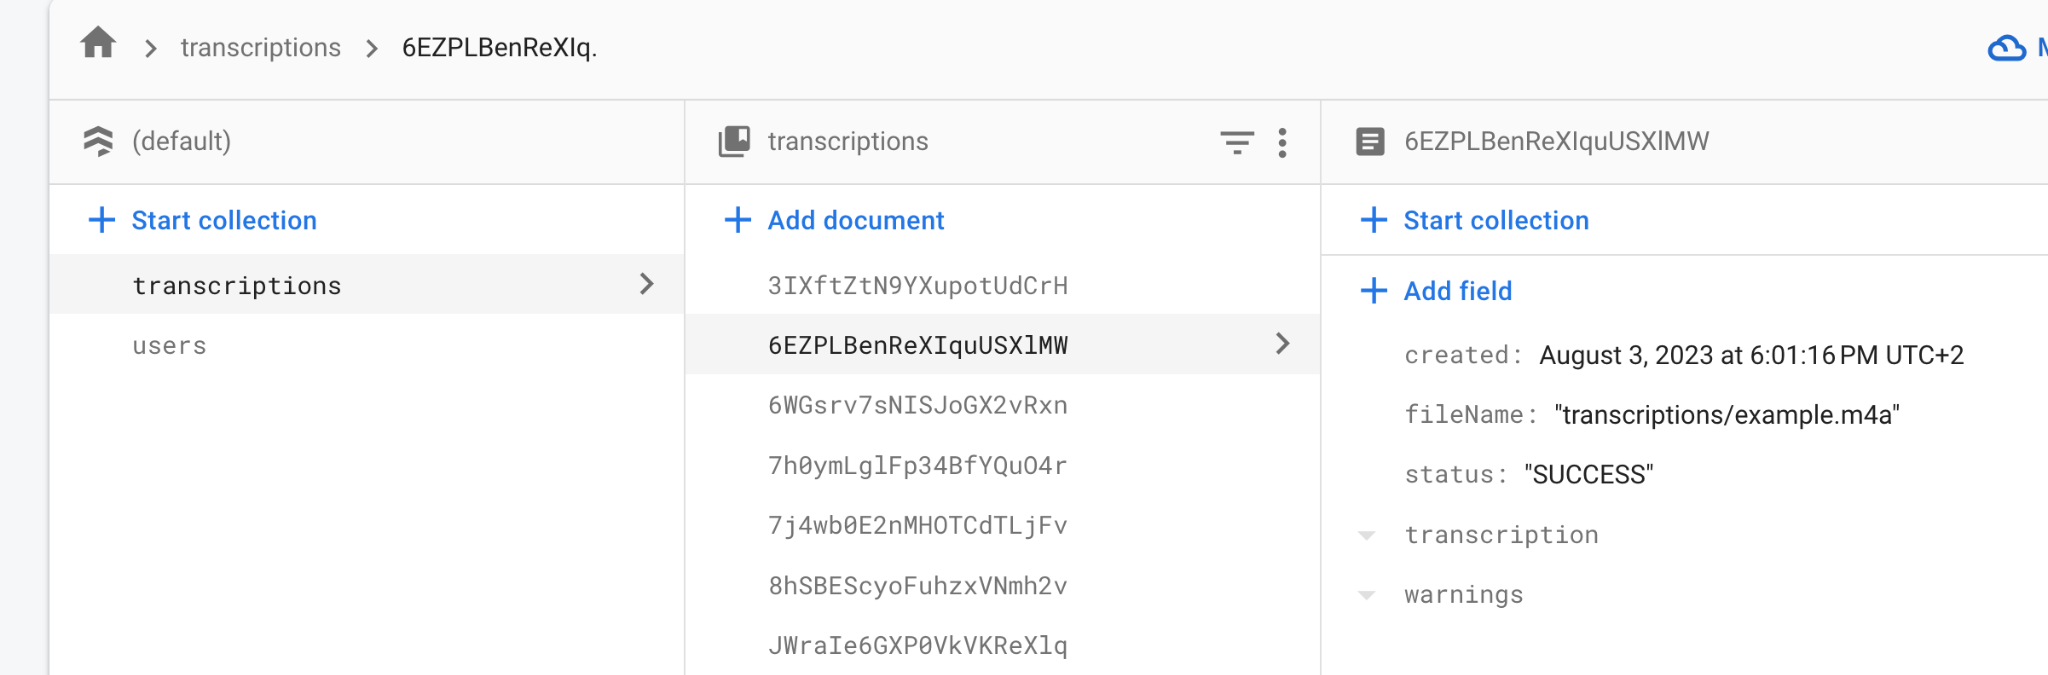
Step 2: Monitor the Transcription Process and Verify Output
The Speech-to-Text extension will automatically process the audio file and output transcription to Cloud Storage or Firestore if you have already configured them.
To monitor this process, set up a listener for the Firestore document where the transcription will be stored.
// fileName here is the path to Firebase Cloud Storage
function listenForTranscription(fileName) {
  // Reference to the collection where transcriptions will be stored
  const transcriptionsRef = db.collection(`users/${userId}/transcriptions`);
  // Query documents with a 'fileName' field matching the provided fileName
  const query = transcriptionsRef.where('fileName', '==', fileName);
  query.onSnapshot(
    (querySnapshot) => {
      if (!querySnapshot.empty) {
        querySnapshot.forEach((doc) => {
          const data = doc.data();
          // Assuming 'transcription' is the field name for the transcription text
          console.log(`Transcription for ${fileName}:`, data.transcription);
          // You can now use this data in your UI
        });
      } else {
        console.log(
          `No transcription document found for fileName: ${fileName}`
        );
      }
    },
    (error) => {
      console.error('Error listening to transcription documents:', error);
    }
  );
}
Step 3: Use the Transcription in Your Application
With the transcription now available in your Firestore document, you can fetch and use it as needed in your application.
// Example call
listenForTranscription('exampleUserId', 'exampleAudioId');
Ensure you replace exampleUserId and exampleAudioId with the actual user ID and audio file ID. For example, exampleAudioId in this example could be audioRef.fullPath
Retrieving a Transcription File’s Download URL from Firebase Storage
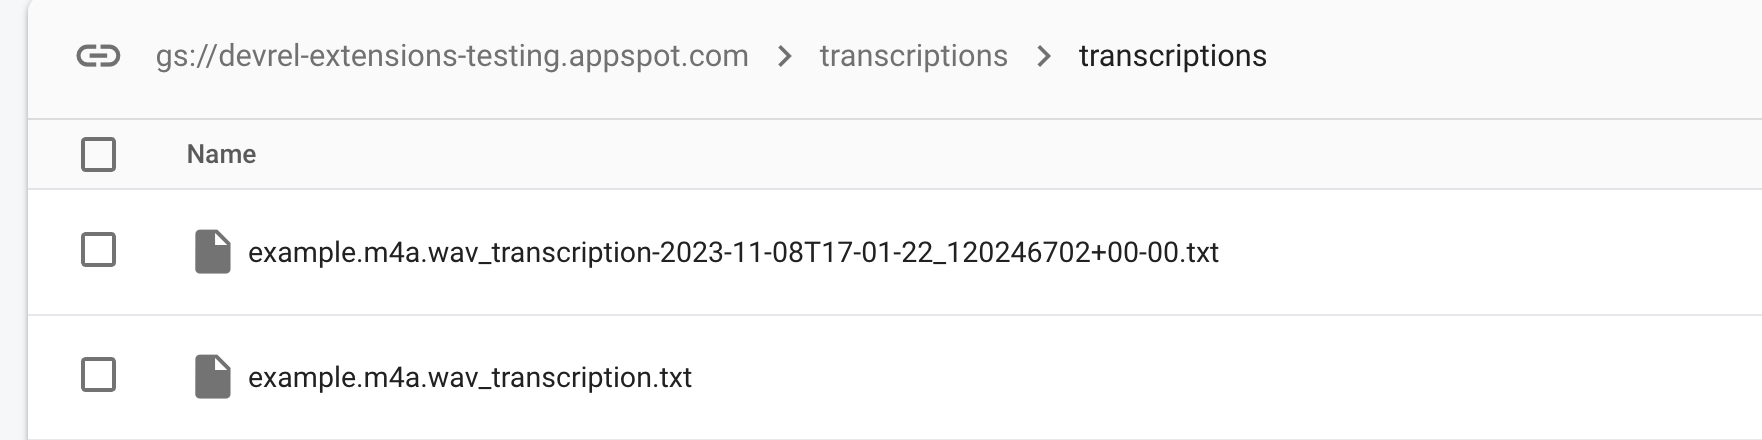
While you can get the transcription from Firestore if you have configured a Collection, you can also get a download URL for the .txt file that will be uploaded to the Firebase Cloud Storage after the transcription process.
Here is an example:
// The transcription is the Storage path that you have configured in the extension

const transcriptionFileRef = storage
  .ref()
  .child(`transcriptions/${file.name}.txt`);

transcriptionFileRef
  .getDownloadURL()
  .then((downloadURL) => {
    // Here you can use the download URL as needed
    console.log('Transcription File Download URL:', downloadURL);
    // Example: Open the URL in a new browser tab
    window.open(downloadURL, '_blank');
  })
  .catch((error) => {
    console.error('Error fetching download URL:', error);
  });
Conclusion
Integrating Firebase’s robust cloud capabilities for file storage and real-time document synchronization allows for a seamless workflow in handling tasks like audio uploads and subsequent transcription retrievals.
Through the provided code snippets and explanations, we’ve explored how to upload audio files to Firebase Storage, trigger cloud functions for transcription, and retrieve the resulting transcription text files. These steps form a cohesive pipeline that leverages Firebase’s Cloud Storage and Firestore to create a scalable and efficient system for processing and retrieving audio transcriptions.
This workflow is highly adaptable and can be customized to fit a variety of use cases, making it an invaluable asset for developers looking to implement sophisticated audio processing features in their applications.