Trigger Email from Firestore
Firebase
Dec 10, 2023
Introduction
Sending and managing emails can be a complex task for developers. This is often a repeated implementation across multiple applications, causing further maintenance and feature requests for a product team to deliver.
The Trigger Email from Firestore extension provides an out-of-the-box solution for sending and managing emails from your Firestore database. This allows developers to provide advanced features through a well maintained solution that can be used in any application.
Sending Emails
Sending emails is one of the oldest technologies, based on the Simple Mail Transfer Protocol (SMTP), with the implementation for these types of services having to be coded within developed services or applications. Typical case scenarios include:
- Send an email message to (multiple) email addresses
- Include other email addresses for reference to the email.
- Send attachments like documents, images and videos.
- Schedule sending emails.
Getting Started
Before installing, ensure you have a Firebase project set up. If it’s your first time, here’s how to get started:
Once your project is prepared, you can integrate the Trigger Email From Firestore extension into your application.
How to get the App Password for Gmail (optional)
If you are testing the extension, and would like to use a Gmail account for sending emails. You will be required to use an App Password.
You can’t use your regular sign-in password for an SMTP connection. Instead, you can create an App Password using your Gmail account. To do so, follow these steps:
- Go to myaccount.google.com
- Go to Security (from the left/right panel)
- Scroll down to Signing in to Google

- If you don’t have 2-step verification, you must first turn it on. Once you finish, you will be able to see the “App Passwords” option
- From the dropdown menu, choose “**Other (custom name)**”
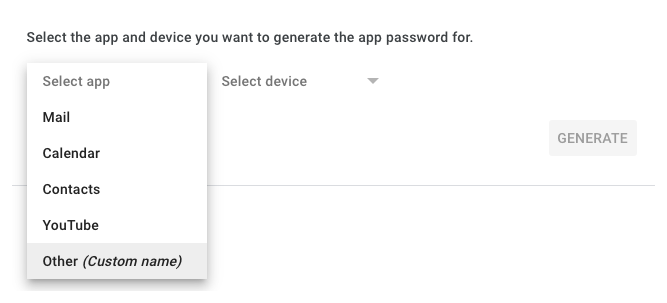
- Provide a name for this password, for example, Firebase Trigger Email Extension
- A dialog will show with a random password, make sure to copy it, then click Done
- The new password will be added to your list.
You can now use this password when installing the extension in the following steps.
Extension Installation
Installing the “Trigger Email From Firestore” extension can be done via the Firebase Console or using the Firebase CLI.
Option 1: Firebase Console
Find your way to the Firebase Extensions catalog, and locate the “Trigger Email From Firestore“ extension. Click Install in Firebase Console and complete the installation process by configuring your extension’s parameters.

Option 2: Firebase CLI
For those who prefer using command-line tools, the Firebase CLI offers a straightforward installation command:
Configure Parameters
Configuring the “Trigger Email From Firestore” extension involves several parameters to help you customize it. Here’s a breakdown of each parameter:
To quickly get started with this extension, there are up-to three fields which must be provided.
Required Configuration
SMTP connection URI
A URI must be provided which the extension will use to send emails through.
This is the connection string for your email server, which typically comprises text in the following format:
smtp(s)://{username}:{password}@smtp.{provider}.com:{port}
For testing purposes you could get one by using your personal or enterprise (G Workspace) Gmail account, e.g.:.
smtp(s)://username@gmail.com:{appPassword}@smtp.gmail.com:465
SMTP password (Optional)
The secrets manager provides a resource for securing sensitive data that can often appear in connection strings. In this case of an SMTP URI, the secret or password you would typically include in your credentials.
For this guide, we are also going to use SMTP password (Optional) to ensure that the account password is securely stored.
Default “From” address
The address will appear in the from field for the generated emails. This can be overridden when creating emails later on.
Default Parameters
Once you finish filling in the required fields you can hit install. To give you more customization options, there are a number of optional fields which you can either configure or leave to default.
Email documents collection
This is the collection where your email documents are stored, adding or modifying a document here will trigger the extension.
Firestore TTL type
Firestore has a Time to Live (TTL) feature that will remove records after a specified period of time. As this is not required for this guide, you can leave this value as Never to ensure no documents are automatically removed.
Firestore TTL value
This value represents the value for how long a document is to be returned. As the above TTL type is set to Never, this field can remain as 1.
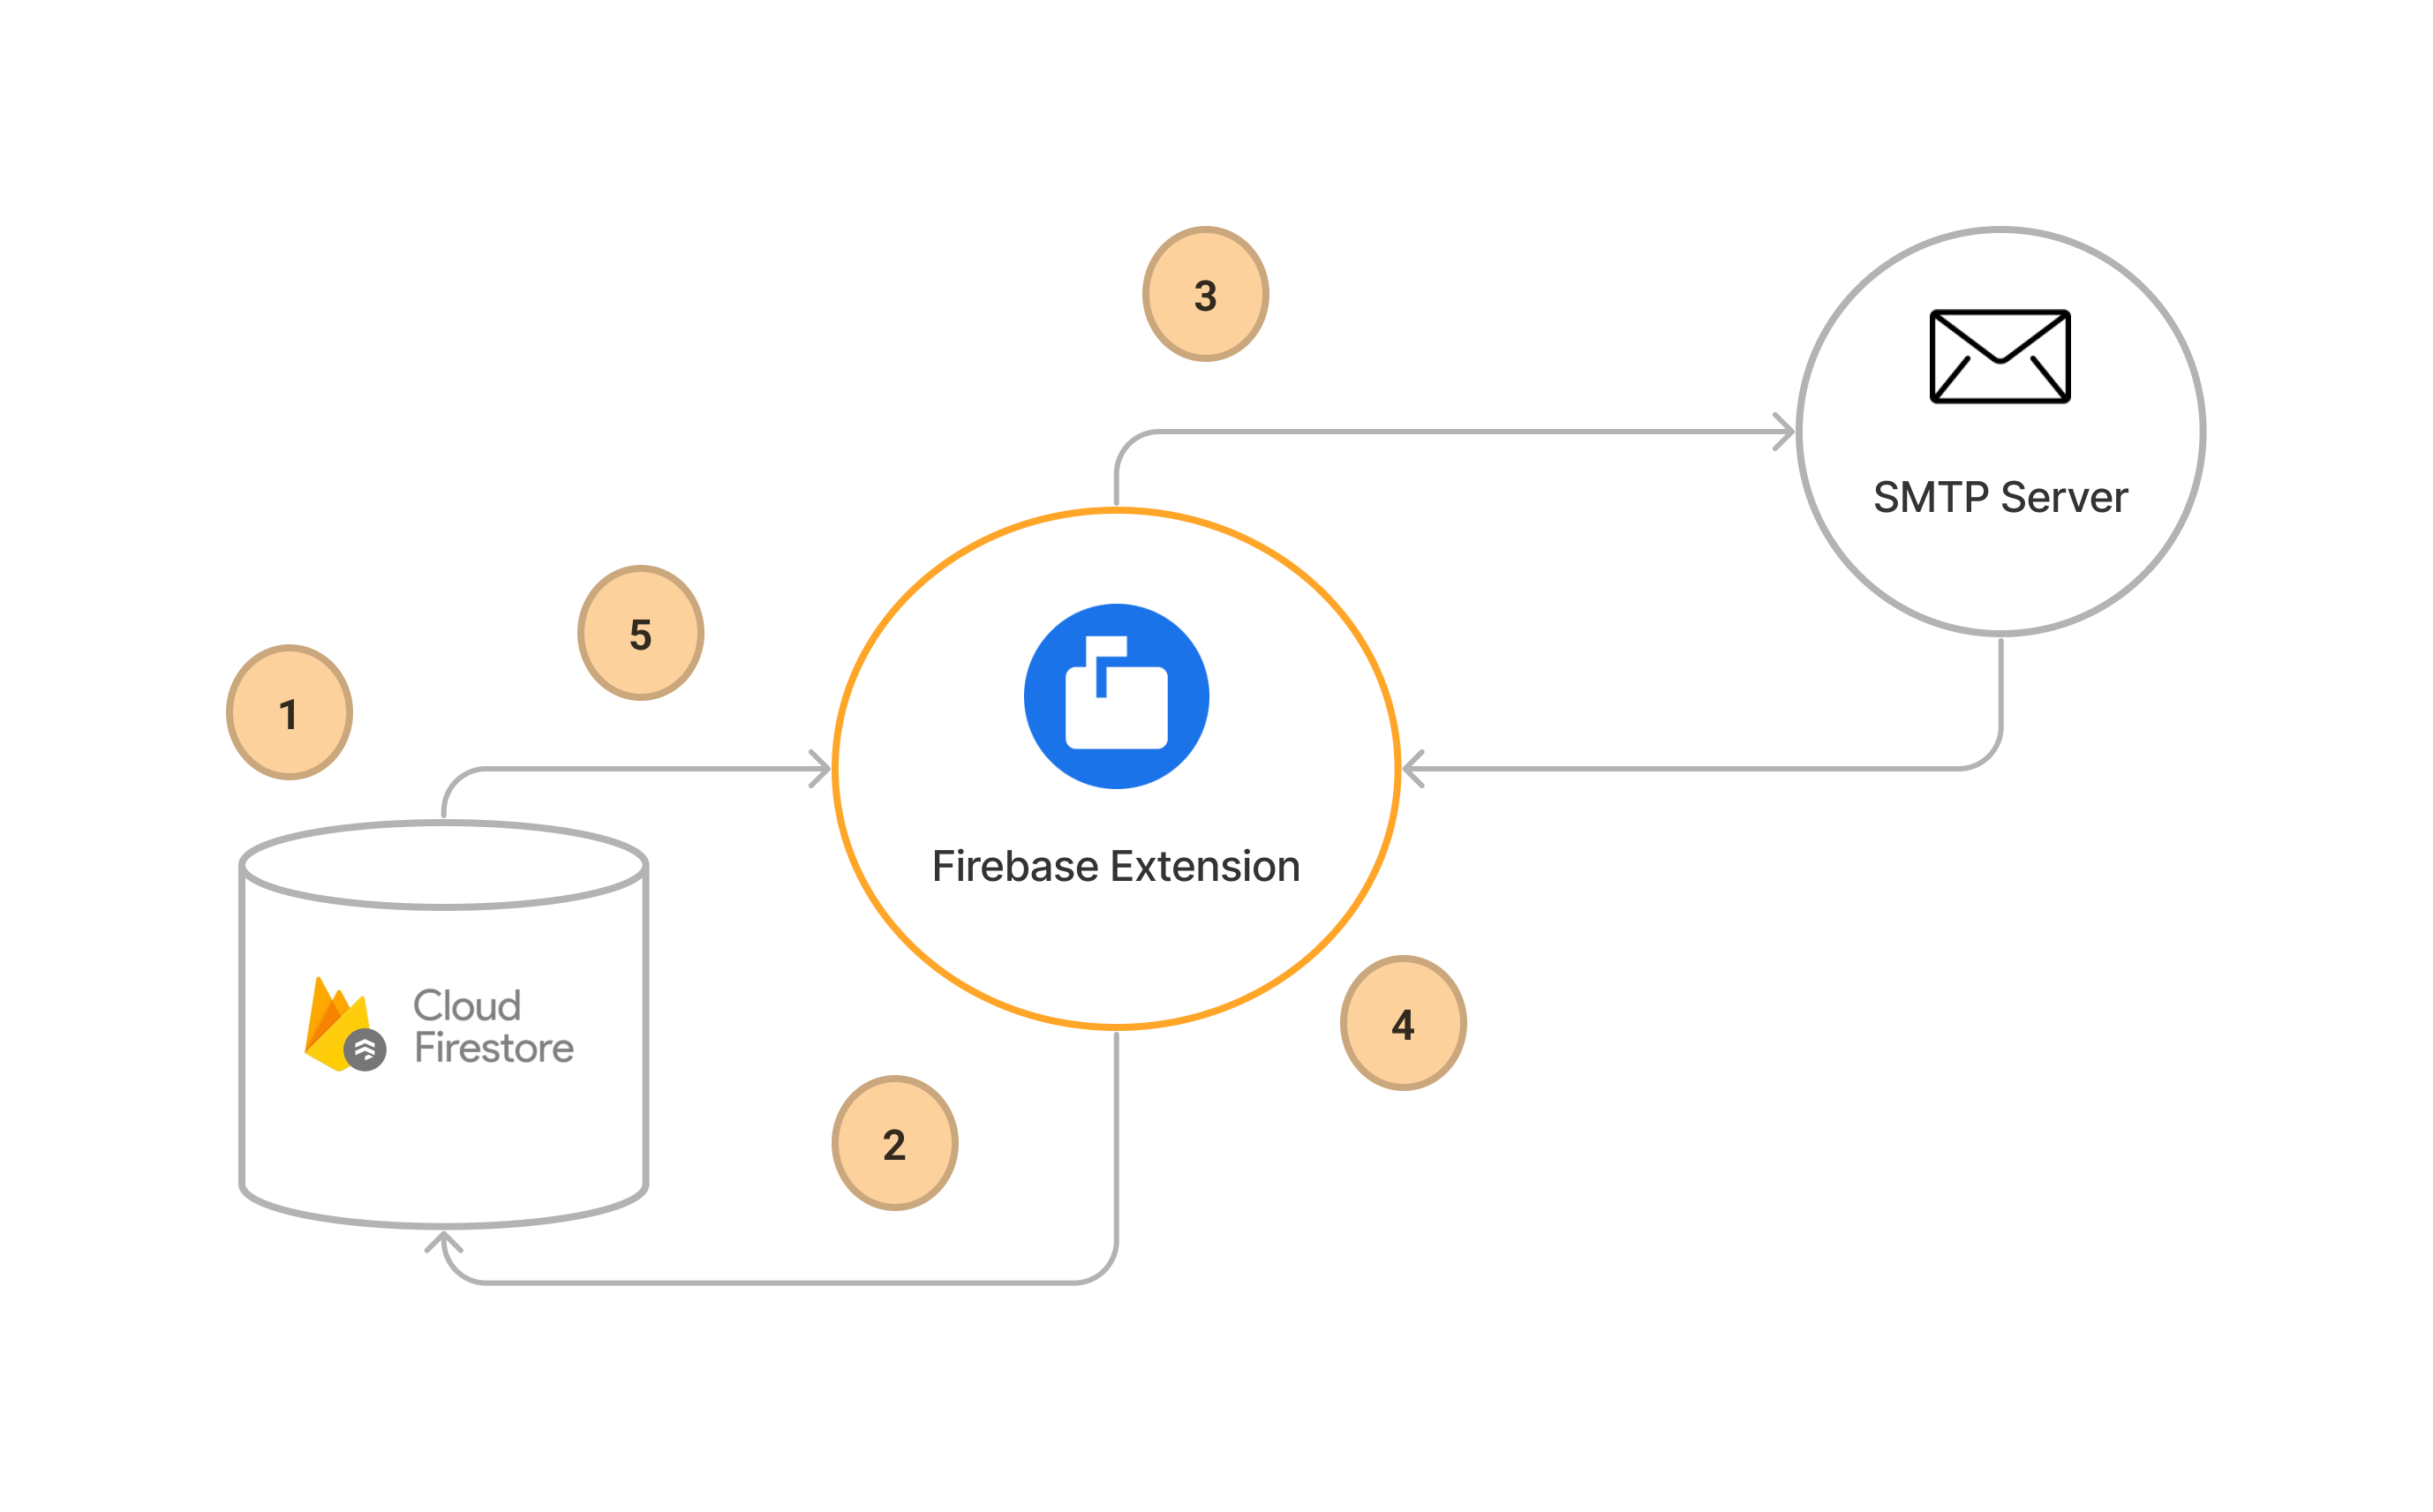
How it works
After installation and configuration, the extension will listen for any new documents that are added to the configured collection. To see it in action:
- Add a new document: By including a to field, alongside a message field with
bodyandsubjectvalues. Tthe extension will attempt to send an email. - Tracking status: While a response from the configured SMTP server is generated, the extension will update the current Firestore document with a status field. This field can include PROCESSING, SUCCESS and ERROR state.
- Sending email request: The extension will send an email to the intended recipients along with the email content.
- Receive Response: When the SMTP server has returned a response, the returned response information is added to the Firestore document. The documents status field is also updated.
- Regenerating a response:: Updating the state field to “RETRY” will regenerate a response.
Steps to connect to the Trigger Email From Firestore
Before you begin, ensure that the Firebase SDK is initialized and you can access Firestore.
const firebaseConfig = {
  // Your Firebase configuration keys
};

firebase.initializeApp(firebaseConfig);
const db = firebase.firestore();
Next, we can simply add a new document to the configured collection to start the conversation.
/** Add a new Firestore document */
const document = await addDoc(collection(firestoreRef, 'collection-name'), {
  to: 'someone@gmail.com',
  message: {
    subject: 'This is a basic email',
    text: 'That requires minimum configuration',
  },
});
Listen for any changes to the collection to display the conversation.
/** Create a Firebase query */
const collectionRef = collection(firestoreRef, 'collection-name');
const q = query(collectionRef, orderBy('delivery.startTime'));

/** Listen for any changes **/
onSnapshot(q, (snapshot) => {
  snapshot.docs.forEach((change) => {
    /** Get email metadata */
    const { to, message, delivery } = change.data();

    /** Update the UI to */
    console.log(to);

    /** Update the UI message */
    console.log(message);

    /** Update the UI delivery */
    console.log(delivery);
  });
});
Conclusion
This example shows how you can easily add email capabilities to your application, while also including real time tracking for the status of your emails.
This extension has many more features including sending attachments, email templates and TTL capabilities. Overall, this extension provides a well tested and feature rich solution for sending emails without coding your own SMTP solution.